
Is your WordPress website loading slowly, causing drops in traffic and conversions? It is no secret that website speed is an essential factor, that contributes to user experience and decides your business’ fate.
To help you speed up your WordPress website page speed, we added essential tips, which can be achieved even without speed optimization plugins.
Our guide aims to help reduce the load times and improve your site performance on a per-page basis.
Why Does WordPress Page Speed Matter?
Page speed is one of the most deciding factors, which influences your crawl rate, SEO, and conversions. It is so important that even Google calculates your website’s metrics, and decides whether to deliver it to users or not. This update is also known as the Core Web Vitals. Its aim is to evaluate the page loading time and decide if users from all around the world can access your website in under 3 seconds.
Anything above 3 seconds of load time is considered slow and will lose you potential customers. Even Neil Patel’s blog post on loading time affection explains how users interact with websites that load over 3 seconds. In fact, 47% of the users have interacted with a slow website on their mobile devices.
As you may know, mobile and desktop speeds is different, and it takes more time for a mobile phone to download your website’s content. It is crucial to understand your website’s speed and take the needed precautions to avoid losing potential website visitors.
How to measure WordPress site speed?
Before trying to optimize your website’s speed, you need to understand where optimizations are needed. The most popular ways of measuring your site speed is by using Page Speed Insights or Pingdom.
These 3 tools will help you evaluate heavy script files, or what content is blocking the page rendering time, which causes slow loading speed.
Measuring speed with Page Speed Insights
To find your website’s speed with Google PSI, head over to Page Speed Insights, and insert your URL in the field. Click analyze, and wait for the reporting process to finish.
Once done, you will have a screen where your scores, and performance metrics will be shown, along with improvements where your website lacks speed.
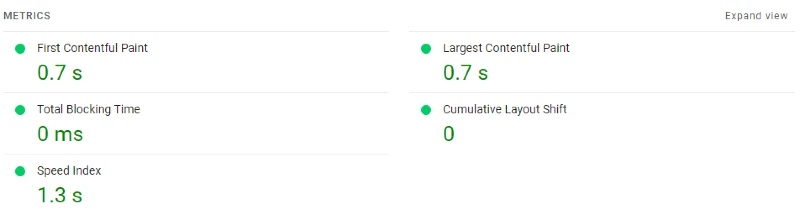
These improvements are based on real tests and could help you manage your website better. However, the page speed tests, are not based on real-user data. Each PSI test is done by emulating a visitor loading your website through the slowest devices possible.
They do these tests to ensure that even users with slower mobile phones or computers can efficiently access your website’s content.
Measuring speed with Pingdom
Pingdom is the 2nd largest and free page speed testing platform, from which you can measure your speed results. To analyze your website, head over to Pingdom, choose a location for testing, and start the test.
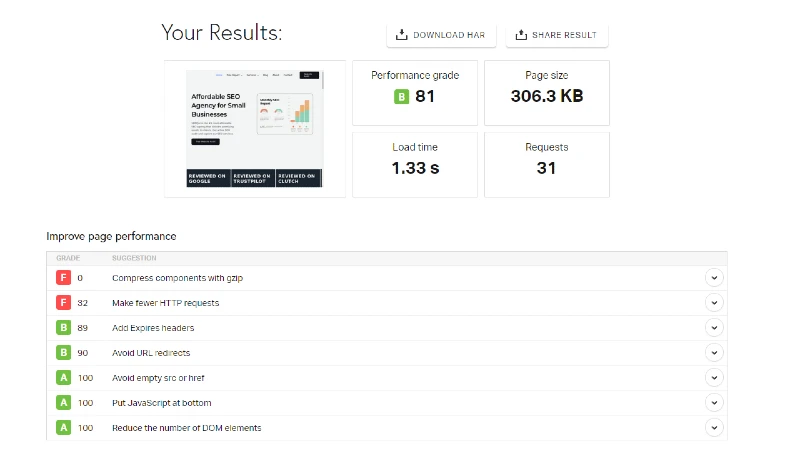
Once your results have been loaded, you can easily analyze what’s causing your website to load slower.
Below, you can find a waterfall with all the assets, contributing to your website’s speed, and additional tips on how each of them can be improved.
27 Tips to Speed Up Your WordPress Site
Combine HTML, CSS, and JavaScript
Combining your HTML, CSS, and JavaScript files into smaller ones can easily reduce page size, and improve the loading time of your website. For example, each theme or plugin loads multiple files, which create multiple requests. Depending on these requests, your website’s speed can be tremendously slower than usual.
While tweaking each plugin, theme, or 3-rd party script could sound like an impossible task, any plugin like WP Minify can easily solve the case and combine your file into a single and smaller one.
Minify HTML, CSS, and JavaScript
WordPress installations often come without any plugins, but can easily get filled up with scripts after discovering the plugin marketplace. Plugins will often be the cause of a slow website, or even using a page builder. While continuing to pile up your plugins one after another, your website speed will start struggling. This is because of the many scripts and styles loaded through your newly added plugin.
To fix this issue, you can use a minification plugin such as WP Rocket, or LS Cache to minify and compress your files.
Move JavaScript to the footer
Moving JavaScript to the footer of your website can significantly improve the processes loaded, and make your site’s first contentful paint faster to load.
By default, all scripts on your website will be loaded in the header. This makes the entire process of downloading HTML, CSS, and imagery files a lot slower than usual. And while you cannot move JS files to the footer manually, there are many WordPress plugins, which can solve this issue for you.
For example, LiteSpeed Cache, WP Rocket, or even Autoptimize can push your JS files to the bottom, just before the closing footer tag. Alternatively, you can use a smaller plugin like Scripts to Footer.
Extract Critical CSS
Extracting critical CSS from pages can happen in 2 different ways. The first one is by visiting the developer’s dashboard, and using the Coverage tab to analyze your website’s resources and asset usages.
Once you have loaded all of your scripts, the Coverage window will display the used CSS in blue, and highlight the unused one in red. For Safari browser, the code should be with opacity, and look like ghost text.
To extract the critical CSS your website uses, you can start by following Modpagespeed’s article on prioritizing critical CSS.
Load CSS Asynchronously
To start loading your CSS Asynchronously, you can use a plugin or simply edit your htaccess file. You can easily follow the given example on any child theme:
<link rel="stylesheet" href="/my/css/path.css" media="print" onload="this.media='all'">The following will ensure that your stylesheet will be asynchronously loaded when a page on your website is being downloaded.
Additionally, you can always use speed optimization plugins to achieve the same result, but without the need of manual editing. For example, configuring LiteSpeed Cache can achieve these results fast.
Remove render-blocking resources
PageSpeed tools often tell you to remove render-blocking resources, which could potentially improve your speed performance. While Page Speed Insights indicates these resources, oftentimes it is hard to just defer them.
The easiest way after JS deferring has been enabled, is by making critical JS and CSS files. Critical CSS files can be loaded in the header of your website, while critical JS can be left below in the body of your page.
NPM is a great library for extracting critical JS, and CSS files, which are also inline, and combining them into smaller packages for faster load times. If you are coding your own theme, this is your best solution.
Resize Images
Your imagery content is the heaviest unit on your website, which often causes the slowest page time, and a slower largest content painful. For example, the hero image of any website can take more than 1 second to load if not optimized properly. The biggest reason for that is the size your the images used.
There are many ways to optimize your images, however, it is safer to resize images manually.
You can right-click on any image element, and choose “Inspect Element”. Afterward, review the size taken on your screen, and dimensions of your image. Resize your image to correspond to your website’s dimensions, and re-upload them.
Convert Images to WebP
Image dimensions play a very important role in download website content. Often times images are uploaded in PNG, JPG, or even JPEG format. While Google recommends using next-gen image formats, many websites haven’t yet transformed their images.
Next-gen image formats are lightweight and can load your website’s content faster. Such images are considered to be WebP, Avif, or even SVG format. They are less than 100KB and don’t take up a lot of website space when uploaded.
The conversion of images can be done by plugins like Smush, or other image optimization plugins.
Lazy-Load images
Lazy loading images is a very efficient process, in which you can save a significant amount of resources. It is a process, where images below the screen of view are being unloaded from the website. Upon reaching these images, a script will directly load them, saving you a huge amount of time to load.
Lazy-loading is a very efficient process, which helps websites load only viewable on first interaction images, while the rest will be hidden until interacted with. It can be achieve by implementing the following example on your website’s images:
<img src="example.png" loading="lazy" alt=image" width="500" height="500">The following example shows how you can easily set images to be lazy-loaded on a browser level.
Another efficient way is by using a lazy loading plugin, or directly image optimization plugin like Smush.
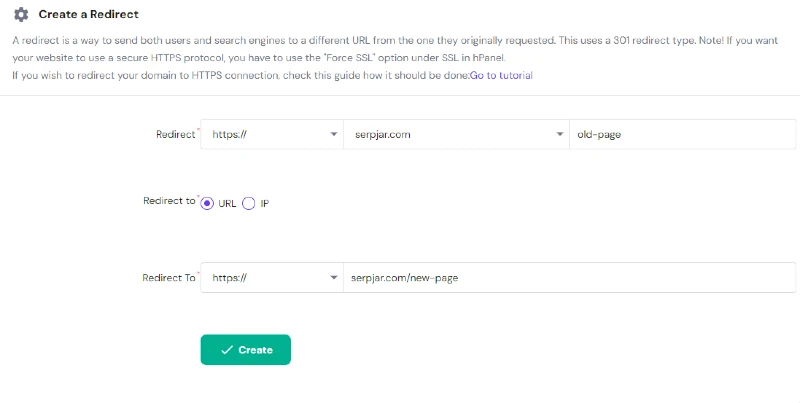
Remove redirects from plugins
Creating redirects is a great SEO practice, which could redirect the link power to new pages, or reroute visitors to the new version of each page. It’s also a best practice when trying to ensure the user experience is uninterrupted.
However, keeping redirect on a site level can sometimes cause massive loading time, as the website needs to send requests to the server, and then receive responses.
To prevent redirects slowing down your website, you can move all redirects on a server level. For example, Hostinger offers a very user-friendly redirection panel, where you can set redirections without making mistakes.
Reduce post revisions
Whenever you make changes to your website blog content, a revision is added. Revisions act as content backups and can be used at any time. They can be quite useful in critical cases, however, they also have a dark side. When revisions start piling up, your website’s database becomes overcrowded, and your WordPress performance becomes compromised.
To avoid piling up a big number of revisions, you can always limit them to an acceptable amount, and keep your site cleaner.
If you want to limit the post revisions to a certain amount, you can open the “WP-config.php” file, and add this code:
define( ‘WP_POST_REVISIONS’, 3 );The number 3 represents how many revisions will be saved on your website. If you set this number to 0, no revisions will be created.
Disable pingbacks and trackbacks
Pingbacks and trackbacks are a very old feature, which was used to notify whenever your website was mentioned across the web. While they were useful, many consider them as a very old, and no longer useful feature.
WordPress still uses them, and allows them by default. You can easily turn them off, by going to your WP dashboard and navigating to Settings, then Discussion.
There you will find the pingbacks, and trackbacks, along with notification for any blogs linked. Disable both of these options and save your website some extra space.
Disable WordPress comments
If your website doesn’t use comments, and doesn’t rely on them, there is an efficient way, they can be stopped. The comments PHP is a larger script, which takes a significant amount of space on your blog posts. Removing them could speed up your blog post pages, and improve your results significantly.
To stop them, you will need to visit your WP-admin dashboard, and navigate to the Settings, then Discussion. From there, you can uncheck the comment posting fields.
However, if you don’t want to disable comments, you can always choose to limit the number of comments, and “Break comments into pages”. This setting will still improve the site load time, as comments will be paginated.
Run the latest version of PHP
Updating your PHP version not only secures your website but is also a sure way to speed it up. It is a very valuable setting, which can be found inside your hosting panel. For each hosting, the setting should be enabled, however, if you cannot do it, ask your hosting provider’s support to change it for you.
Before choosing the PHP version, you will need to ensure that all plugins are compatible, as your website might suffer damage.
Choose a lightweight theme
WordPress themes can vary from one to another. There are thousands of themes available in the WordPress theme page, however, not all of them can load faster than the previous one. Especially, when talking about free WordPress themes, most of them can slow down your site tremendously.
It is of crucial importance to find a free and fast WordPress theme, purchase one from a reputable site, or get one developed for your business.
Most developers can easily create a fast-loading WordPress theme by using a barebones theme, and apply the necessary features to run your website at a good speed.
Avoid Slow Page Builders
Page Builders are often the root cause of slow WordPress websites. While they make your website look fancy, the fanciness comes with a certain price. Your website’s speed gets massively affected due to the numerous JS and CSS files loaded on each of your pages. While optimizations can help you reduce the impact, it is best to use faster page builders for WordPress.
Jack Cao has created a documented process of the load time on each page builder.
Use a CDN
A CDN stands for Content Delivery Network, and it’s a very efficient way to boost your WordPress site speed. The main purpose of a CDN is to cache and deliver your site’s content to all users across the world.
Once your website is cached by the CDN, it will start delivering it from its nearest location. For example, Cloudflare is a free and optimal CDN with hundreds of datacenters in the world.
Its setup is fairly easy and could help you reduce your server resources and increase the page load speed.
Aside from Cloudflare there are many professional CDNs for WordPress users like QuicCloud.
Start Caching your Website
One of the easiest and recommended methods to optimize your site speed is by installing a caching plugin. Caching plugins store your website in a static format, which lowers requests, lookups, and loads website faster.
Caching simply catches your latest website version, and delivers it to users every time they try to visit your web page. You can specify how long cache will last, and easily clear it, so the next version of your site is sent.
When caching your website’s content, your HTML, JS, CSS, fonts, videos, and image files are saved as static files. However, if you have dynamic website content, it can be excluded, so the user experience doesn’t get interrupted.
There are many great WordPress caching plugins, but the fastest are LiteSpeed Cache, WP Rocket, and W3 Total Cache.
Remove or Delay Third-Party Scripts
External or third-party scripts are the codes used on your website but hosted outside of it. For example, Google Analytics is an external (3rd party script), which is loaded on your website, but hosted by Google.
These scripts can often slow WordPress websites since their JavaScript execution gets delayed whenever called.
An efficient way to maintain a healthier website is to optimize Third-Party scripts by localizing them or completely removing them from your site.
Move Google Analytics to Footer
Whenever you create a website, the first thing that pops into your mind is installing Google Tag Manager and Google Analytics. These tools combined take more than 50KB of space and could cause massive render-blocking if not loaded properly.
A great way to prevent the render-blocking caused by the Gtag and GA script is by moving them before the closing </footer> on your website. Another great example is using the Lightweight Google Analytics plugin, which minimizes requests and loads the scripts from the footer.
Compress files with GZIP
Compressing files with GZIP is an essential step to optimizing your WordPress speed, and requires just a few minutes of your time. If you haven’t heard, GZIP can reduce your file sizes by 70%, since it compresses files in a timely manner. GZIP doesn’t require a powerful server to work. In fact, it uses minimum server resources and will apply great optimization for a small amount of time.
To enable GZIP on your website, you can either use CloudFlare for a CDN provider or manually insert a code inside your .htaccess file.
For CloudFlare, you will need additional setup and connecting your DNS with CloudFlare’s. After the setup has been completed, you can turn on Brotli Compression, and allow their GZIP to compress your files.
If you wish to activate GZIP through your website, you can manually add the following script inside your .htaccess file:
<IfModule mod_deflate.c>
AddOutputFilterByType DEFLATE application/javascript
AddOutputFilterByType DEFLATE application/rss+xml
AddOutputFilterByType DEFLATE application/vnd.ms-fontobject
AddOutputFilterByType DEFLATE application/x-font
AddOutputFilterByType DEFLATE application/x-font-opentype
AddOutputFilterByType DEFLATE application/x-font-otf
AddOutputFilterByType DEFLATE application/x-font-truetype
AddOutputFilterByType DEFLATE application/x-font-ttf
AddOutputFilterByType DEFLATE application/x-javascript
AddOutputFilterByType DEFLATE application/xhtml+xml
AddOutputFilterByType DEFLATE application/xml
AddOutputFilterByType DEFLATE font/opentype
AddOutputFilterByType DEFLATE font/otf
AddOutputFilterByType DEFLATE font/ttf
AddOutputFilterByType DEFLATE image/svg+xml
AddOutputFilterByType DEFLATE image/x-icon
AddOutputFilterByType DEFLATE text/css
AddOutputFilterByType DEFLATE text/html
AddOutputFilterByType DEFLATE text/javascript
AddOutputFilterByType DEFLATE text/plain
AddOutputFilterByType DEFLATE text/xml
</IfModule>
The .htaccess file can be found inside your WordPress installation folder, or edited through a plugin like Htaccess File Editor.
Remove unnecessary Cron Jobs
WordPress websites are filled with Cron Jobs. They are specialized tasks, scheduled to run as background processes at specific intervals. While they have minimum impact on speed, adding too many plugins can significantly increase the Cron tasks.
To measure and remove Cron Jobs on your website, you can use a plugin like Advanced Cron Manager.
Advanced Cron Manager helps you identify, stop, or delay certain Cron Jobs to reduce resource usage and improve your website performance on a page basis.
Disable WordPress heartbeat
The WordPress heartbeat is a very resource-hungry Cron Job, which often creates AJAX calls on your website. It creates unnecessary checks and requests every 15 seconds. There are many tools that could help you monitor your site’s health, without slowing it down. It is also recommended to make health, uptime, and other checkups outside of your website, so you don’t overload your website with scripts.
To stop your WordPress heartbeat, you can use a plugin like LiteSpeed Cache, install heartbeat control plugins, or insert a small code snippet in your functions php file:
add_action( ‘init’, ‘stop_heartbeat’, 1 ); function stop_heartbeat() { wp_deregister_script(‘heartbeat’); }
Host fonts locally
Fonts are oftentimes the main cause of render-blocking and other CSS-related errors. Whenever you try to defer, or even extract CSS files, or preload fonts, you can encounter delays or even broken page designs. A reason for that is the incorrect optimizations on your website, or because of hosting 3-rd party fonts.
An easy way to prevent this from happening, and speed up your site is by hosting your fonts locally. The manual way of achieving this is by downloading each font and uploading it to your Page Builder or theme.
However, this can be achieved with a WordPress plugin like Custom Fonts, which lets you host your fonts locally without requiring technical knowledge.
Tips to Clean your WordPress Website
Delete unused plugins and themes
To keep your WordPress website clean, and its speed crispy clean, make sure to keep plugins and themes updated at all times. While WordPress allows you to use only 1 theme, many can be left hanging unused. Deleting your unused WP themes can essentially improve the loading speed, and prevent your website from backdoors and malware insertions.
The same goes for inactive or deactivated plugins. Simply updating them can just keep your wp-cron task review of the existing elements. Deleting your unused plugins can potentially free your website’s resources.
Clean up your database
The WordPress database is the heaviest part of your website, especially, when left to rot and gather more plugin data. The more plugins, themes, and edits made on your website, the larger your database grows.
For example, deleting your old plugins, will not delete their data from the database. This leaves a safe backup if you decide to return to using your old plugins.
If you want to clean your database consider using a plugin like WP-Sweep, which cleans your old data such as MySQL queries, revisions, and more. Alternatively, you can use Advanced Database Cleaner, which clears even more content and will free up more space in your database.
Clean up your Media Library
The most inflated memory place in your WP installation is the media library. If you ever run into optimizing your images manually, oftentimes it requires re-uploading them. Once re-uploaded the old images are left existent, and forgotten to be deleted. In such cases, your media library gets filled with unused images which could slow down your website.
To delete the images from your website, you can always go to the Media Library, find the unattached images, and then delete them. These images will free up lots of space, and help you upload 5 times more images since now you know how to optimize them.